Access Data From Post Request File Upload
Editor'due south note: This article was last updated 24 March 2022 to reflect updates to Node.js and the trunk-parser library.
Multer is a Node.js middleware for handling multipart/form-data that makes the otherwise painstaking process of uploading files in Node.js much easier. In this article, nosotros'll larn the purpose of Multer in handling files in submitted forms. Nosotros'll besides explore Multer past building a mini app with a frontend and backend to test uploading a file. Allow'southward get started!
Table of contents
- Managing user inputs in forms
- Encoding and uploading forms with Multer
- Multer: an overview
- Edifice an app with Multer support
- Creating our frontend
- Install and configure Multer
- Conclusion
Managing user inputs in forms
Web applications receive all different types of input from users, including text, graphical controls like checkboxes or radio buttons, and files, like images, videos, and other media.
In forms, each of these inputs are submitted to a server that processes the inputs, uses them in some way, perhaps saving them somewhere else, and so gives the frontend a success or failed response.
When submitting forms that comprise text inputs, the server, Node.js in our case, has less work to do. Using Express, you can easily grab all the inputs entered in the req.body object. However, submitting forms with files is a bit more circuitous considering they require more processing, which is where Multer comes in.
Encoding and uploading forms with Multer
All forms include an enctype attribute, which specifies how data should be encoded past the browser before sending it to the server. The default value is application/x-www-form-urlencoded, which supports alphanumeric information. The other encoding type is multipart/form-information, which involves uploading files through forms.
At that place are 2 ways to upload forms with multipart/form-information encoding. The first is by using the enctype attribute:
<form action='/upload_files' enctype='multipart/course-data'> ... </grade>
The lawmaking above sends the form-data to the /upload_files path of your application. The 2d is by using the FormData API. The FormData API allows usa to build a multipart/form-data class with cardinal-value pairs that can exist sent to the server. Here's how it'south used:
const grade = new FormData() course.suspend('name', "Dillion") class.append('image', <a file>) On sending such forms, information technology becomes the server'southward responsibility to correctly parse the form and execute the final functioning on the information.
Multer: an overview
Multer is a middleware designed to handle multipart/class-data in forms. It is similar to the popular Node.js body-parser, which is congenital into Express middleware for class submissions. Simply, Multer differs in that it supports multipart data, only processing multipart/grade-data forms.
Multer does the work of body-parser by attaching the values of text fields in the req.torso object. Multer also creates a new object for multiple files, eitherreq.file or req.files, which holds information about those files. From the file object, you lot can pick whatever information is required to post the file to a media management API, like Cloudinary.
At present that nosotros understand the importance of Multer, we'll build a small-scale sample app to show how a frontend app can send iii different files at in one case in a form, and how Multer is able to procedure the files on the backend, making them available for further use.
Building an app with Multer back up
We'll offset by edifice the frontend using vanilla HTML, CSS, and JavaScript. Of grade, y'all can hands use whatsoever framework to follow along.
Creating our frontend
First, create a binder called file-upload-example, then create another binder called frontend inside. In the frontend binder, nosotros'll accept iii standard files, index.html, styles.css, and script.js:
<!-- index.html --> <trunk> <div class="container"> <h1>File Upload</h1> <form id='course'> <div course="input-group"> <characterization for='proper name'>Your name</characterization> <input name='proper noun' id='proper noun' placeholder="Enter your name" /> </div> <div grade="input-grouping"> <label for='files'>Select files</label> <input id='files' type="file" multiple> </div> <button course="submit-btn" type='submit'>Upload</push button> </form> </div> <script src='./script.js'></script> </body>
Notice that we've created a label and input for Your Name as well equally Select Files. We also added an Upload push.
Adjacent, nosotros'll add the CSS for styling:
/* style.css */ trunk { groundwork-color: rgb(six, 26, 27); } * { box-sizing: border-box; } .container { max-width: 500px; margin: 60px automobile; } .container h1 { text-align: center; colour: white; } grade { groundwork-color: white; padding: 30px; } form .input-group { margin-lesser: 15px; } form label { brandish: block; margin-lesser: 10px; } form input { padding: 12px 20px; width: 100%; border: 1px solid #ccc; } .submit-btn { width: 100%; border: none; background: rgb(37, 83, 3); font-size: 18px; color: white; edge-radius: 3px; padding: 20px; text-align: center; } Below is a screenshot of the webpage so far:
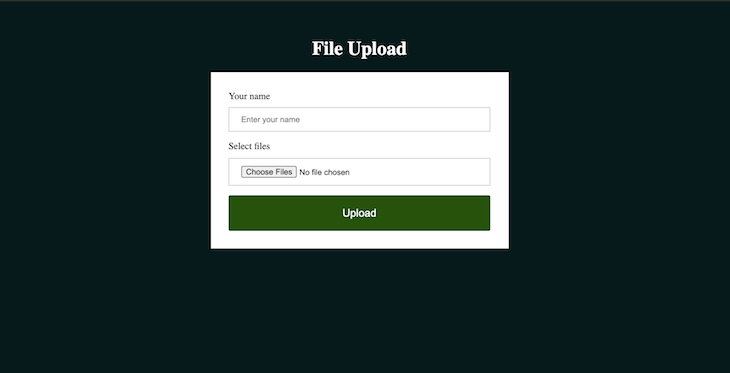
As yous tin come across, the form we created takes two inputs, proper noun and files. The multiple aspect specified in the files input enables us to select multiple files.
Next, we'll send the form to the server using the code below:
// script.js const form = document.getElementById("class"); form.addEventListener("submit", submitForm); function submitForm(e) { e.preventDefault(); const name = document.getElementById("name"); const files = document.getElementById("files"); const formData = new FormData(); formData.append("proper name", name.value); for(allow i =0; i < files.files.length; i++) { formData.append("files", files.files[i]); } fetch("http://localhost:5000/upload_files", { method: 'POST', body: formData, headers: { "Content-Blazon": "multipart/form-data" } }) .and then((res) => panel.log(res)) .grab((err) => ("Error occured", err)); } There are several important things that must happen when we utilize script.js. First, we get the form element from the DOM and add a submit event to it. Upon submitting, we use preventDefaultto foreclose the default activeness that the browser would accept when a form is submitted, which would normally be redirecting to the value of the activity aspect. Next, nosotros go the name and files input chemical element from the DOM and createformData.
From hither, nosotros'll suspend the value of the name input using a fundamental of name to the formData. Then, nosotros dynamically add the multiple files we selected to the formData using a key of files.
Note: if we're only concerned with a single file, nosotros can append
files.files[0].
Finally, we'll add a POST asking to http://localhost:5000/upload_files, which is the API on the backend that we'll build in the adjacent section.
Setting up the server
For our demo, we'll build our backend using Node.js and Limited. We'll ready a elementary API in upload_files and outset our server on localhost:5000. The API volition receive a POST request that contains the inputs from the submitted form.
To use Node.js for our server, we'll need to fix upwardly a basic Node.js project. In the root directory of the project in the terminal at file-upload-example, run the following code:
npm init -y
The control above creates a bones package.json with some information virtually your app. Adjacent, nosotros'll install the required dependency, which for our purposes is Express:
npm i express
Adjacent, create a server.js file and add the following code:
// server.js const express = require("express"); const app = limited(); app.use(express.json()); app.use(express.urlencoded({ extended: truthful })); app.mail service("/upload_files", uploadFiles); function uploadFiles(req, res) { console.log(req.body); } app.listen(5000, () => { console.log(`Server started...`); }); Express contains the bodyParser object, which is a middleware for populating req.trunk with the submitted inputs on a form. Calling app.employ(express.json()) executes the middleware on every request made to our server.
The API is set up up with app.mail('/upload_files', uploadFiles). uploadFiles is the API controller. As seen to a higher place, nosotros are just logging out req.trunk, which should exist populated by epxress.json(). We'll exam this out in the instance below.
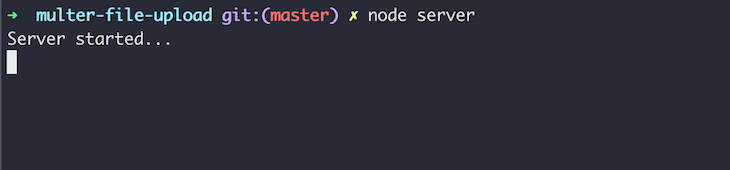
Running body-parser in Express
In your final, run node server to start the server. If done correctly, y'all'll run across the following in your terminal:
Y'all can now open your frontend app in your browser. Fill in both inputs in the frontend, the name and files, then click submit. On your backend, you should run into the following:
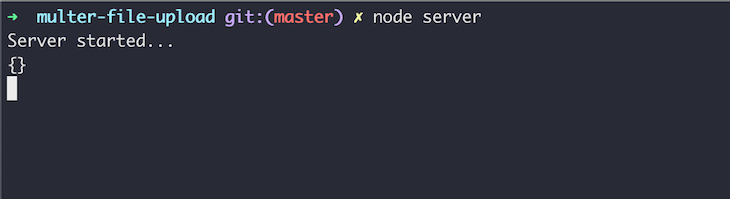
The code in the image above means that the req.body object is empty, which is to be expected. If you'll recall, trunk-parser doesn't back up multipart data. Instead, we'll use Multer to parse the form.
Install and configure Multer
Install Multer by running the following command in your terminal:
npm i multer
To configure Multer, add the post-obit to the acme of server.js:
const multer = crave("multer"); const upload = multer({ dest: "uploads/" }); ... Although Multer has many other configuration options, we're only interested in thedest property for our project, which specifies the directory where Multer volition salvage the encoded files.
Adjacent, we'll use Multer to intercept incoming requests on our API and parse the inputs to make them available on the req object:
app.post("/upload_files", upload.array("files"), uploadFiles); part uploadFiles(req, res) { panel.log(req.body); console.log(req.files); res.json({ message: "Successfully uploaded files" }); } To handle multiple files, utilise upload.array. For a single file, apply upload.single. Note that the files argument depends on the name of the input specified in formData.
Multer volition add the text inputs to req.torso and add the files sent to the req.files array. To see this at work in the terminal, enter text and select multiple images on the frontend, and so submit and bank check the logged results in your terminal.
As you lot tin can encounter in the example below, I entered Images in the text input and selected a PDF, an SVG, and a JPEG file. Below is a screenshot of the logged result:

For reference, if y'all want to upload to a storage service like Cloudinary, you will take accept to send the file directly from the uploads binder. The path property shows the path to the file.
Conclusion
For text inputs alone, the bodyParser object used within of Express is enough to parse those inputs. They make the inputs available every bit a central value pair in the req.trunk object. Multer comes in handy when forms contain multipart data that includes text inputs and files, which the torso-parser library cannot handle.
With Multer, you can handle single or multiple files in addition to text inputs sent through a form. Think that y'all should simply employ Multer when y'all're sending files through forms, considering Multer cannot handle any form that isn't multipart.
In this article, nosotros've seen a brief of form submissions, the benefits of trunk parsers on the server and the role that Multer plays in handling form inputs. We also built a small application using Node.js and Multer to see a file upload process.
For the side by side steps, you tin expect at uploading to Cloudinary from your server using the Upload API Reference. I hope y'all enjoyed this article! Happy coding!
200's only  Monitor failed and slow network requests in production
Deploying a Node-based web app or website is the like shooting fish in a barrel part. Making certain your Node instance continues to serve resources to your app is where things become tougher. If you're interested in ensuring requests to the backend or third political party services are successful, try LogRocket.  https://logrocket.com/signup/
LogRocket is like a DVR for web and mobile apps, recording literally everything that happens while a user interacts with your app. Instead of guessing why bug happen, you can amass and report on problematic network requests to quickly understand the root cause.
LogRocket instruments your app to record baseline operation timings such as folio load time, fourth dimension to first byte, slow network requests, and also logs Redux, NgRx, and Vuex actions/country. Offset monitoring for gratis.
Source: https://blog.logrocket.com/multer-nodejs-express-upload-file/
0 Response to "Access Data From Post Request File Upload"
Postar um comentário